Thursday 19 October 2017

GridLink Data Source


A GridLink data source lets you provide connectivity between WebLogic Server and an Oracle RAC database service, which is targeted to an Oracle RAC cluster. Database services are abstractions for workloads with common characteristics. A GridLink data source is independent of the number of nodes in a RAC cluster. You can use Oracle SCAN (Single Client Access Name) addresses to configure both the Transparent Network Substrate (TNS) and Oracle Notification Service (ONS) listeners. Using a SCAN address means that you don't need to change anything when you add or remove nodes from the RAC configuration.

Configuring the GridLink Data Source

The simplest way to create a GridLink data source connection pool is using the WebLogic administration console. The steps are very similar to creating a single instance data source, except that there are a few additional questions, especially pertaining to ONS.
Firstly go to create a JDBC data source and choose the GridLink option:
Now, like a regular data source, you are asked for details about its JNDI name and transaction support:
 Usually you will use the wizard to set up the JDBC URL for you:
Now enter details about the RAC database, service and user. Note my example here uses VIP names (which you should always use for 10.2 and above RAC databases), though you should be able to use a SCAN instead if you are using an 11.2 database.
  
Next you are presented a deep screen with all the database access details, including the innocuous looking test table, and a convenient button to test the database connection to all listeners in the cluster. Note you still don't have the option on this screen to change the pool size which puzzles me - in any non-trivial environment that is something you always want to do and yet you have to go back into the configuration afterwards to amend it.
  
Now this is where things get interesting! You'll see the "FAN enabled" tick-box and a place to enter the ONS details typically, though not necessarily, on the database servers. This is ticked by default and the UI makes sure you enter at least one ONS server (of course, as FAN is not going to work otherwise).
You'll also notice the wallet parameters which allow the ONS messages to be sent over SSL - usually a good practice in production.
 
The next page allows you to test connectivity with the ONS servers. This is handy as in production you will probably have requested firewall ports to be opened between the application server DMZ and the database zone and this allows you easily verify such a change is working. 
Finally, as for other types of data source, you choose which (usually) managed servers to assign it to, and then you're done.
Note I have had a warning message at this point but the data source was still activated - I'm not sure why. In this case it was happy though:
This is how my configuration looks in the JDBC file referenced from the domain's config.xml:


  racb-ds
 
    jdbc:oracle:thin:@(DESCRIPTION=(ADDRESS_LIST=(ADDRESS=(PROTOCOL=TCP)(HOST=westfield03)(PORT=1521))(ADDRESS=(PROTOCOL=TCP)(HOST=westfield04)(PORT=1521)))(CONNECT_DATA=(SERVICE_NAME=appa)))
    oracle.jdbc.OracleDriver
   
     
        user
        hr


    {AES}...


    5
    15
    1
    SQL SELECT 1 FROM DUAL
    10
    LRU


    jdbc/racb-ds
    OnePhaseCommit


    true
    westfield03:6200,westfield04:6200
   
 
What is interesting to me about this is that it is almost identical to a regular/'generic' Oracle JDBC data source - the only difference (for the same transaction regime) is the additional properties (shown above in bold).

Monitoring

You can monitor a GridLink data source through the WebLogic administration console in the same way as multi data sources, e.g. numbers of connections to each RAC instance. There are new tabs for ONS though which allow you to check connectivity once the data source is running:
You can also view the data source status, like any other, on the Monitoring Dashboard:


Licensing

This section is no longer relevant - see later blog post 27/7/11 
As I mentioned earlier, at the time of writing, the functionality described above is not included in any of the WebLogic Server licences (Basic, Standard, Enterprise or Suite). You are only allowed to use this feature in test and production environments if you have one of:
  • an Exalogic Server: starting at $475,000 for a quarter rack (8 computer nodes) hardware, plus WebLogic licences etc, or,
  • the Exalogic Elastic Cloud software: this costs an additional $20,000 per Oracle Processor on top of WebLogic Suite.
Note even if you have an Exadata you are still not allowed to use GridLink data sources from a non-Exalogic WebLogic installation unless you have bought the Exalogic Elastic Cloud software.
As most people know, the Oracle licensing police don't take prisoners so if you're not on Exalogic and haven't paid for the extra Elastic Cloud licences you need to make sure your WebLogic administrators are fully aware that they mustn't use GridLink Data Sources. Note: I haven't seen of a way to switch off their availability in the console. Also, as you can see from the earlier configuration snippet, it is easy for Oracle to tell if you are using a GridLink data source, and I am sure their use will be included in auditing scripts.

Wednesday 18 October 2017

WebLogic 12.1.2 Futures


WebLogic 12.1.2 Futures
1. Dynamic Cluster Support:
It is one of the most striking features of WebLogic 12.1.2. This release introduces use of the dynamic cluster for a highly scalable systems, high availability environment.  Dynamic cluster allows the managed servers to be automatically added based on a server template.
2. Support with Oracle Database 12c.
3. JMS enhancements:
Supports clustered targeted JMS Servers for providing high availability  eliminating the need to configure many JMS resources for every single server.
4. Enhanced maven support.
Support for POMs, Maven 3.0.4.
5. WebSocket support.
Supports for WebSocket Protocol (RFC 6455),which provides two-way, full-duplex communication over a single TCP connection between clients and servers, where each side can send data independently from the other. The WebSockets communication model occurs in real-time and promotes user interaction.

Weblogic 12.1.2 Update

Weblogic 12.1.2 Update

Note:

As of WebLogic Server 12.1.2, Oracle no longer provides upgrade installers. You must install WebLogic Server 12.1.2 to a new directory location. You cannot install it over an existing installation.

Weblogic 12.2.1.1 Install


Steps to install weblogic 12.2.1.1

step1: Create oraInst.loc

oraInst.loc
inst_group=soa
inventory_loc=/apps


step2 : Create .rsp file, Update the ORALCE_HOME Variable


WLS1221ResponseFile.rsp


#DO NOT CHANGE THIS.
Response File Version=1.0.0.0.0

[GENERIC]

#The oracle home location. This can be an existing Oracle Home or a new Oracle Home
ORACLE_HOME=/apps/Oracle/1221/oracle_home
#Set this variable value to the Installation Type selected. e.g. WebLogic Server, Coherence, Complete with Examples.
INSTALL_TYPE=Complete with Examples

#Provide the My Oracle Support Username. If you wish to ignore Oracle Configuration Manager configuration provide empty string for user name.
MYORACLESUPPORT_USERNAME=

#Provide the My Oracle Support Password
MYORACLESUPPORT_PASSWORD=

#Set this to true if you wish to decline the security updates. Setting this to true and providing empty string for My Oracle Support username will ignore the Oracle Configuration Manager configuration
DECLINE_SECURITY_UPDATES=true

#Set this to true if My Oracle Support Password is specified
SECURITY_UPDATES_VIA_MYORACLESUPPORT=false

#Provide the Proxy Host
PROXY_HOST=

#Provide the Proxy Port
PROXY_PORT=

#Provide the Proxy Username
PROXY_USER=

#Provide the Proxy Password
PROXY_PWD=

#Type String (URL format) Indicates the OCM Repeater URL which should be of the format [scheme[Http/Https]]://[repeater host]:[repeater port]
COLLECTOR_SUPPORTHUB_URL=
 

Step3:Run the below command

 java -Djava.io.tmpdir=/apps -jar /apps/fmw_12.2.1.1.0_wls.jar -silent -invPtrLoc /apps/oraInst.loc -responseFile /apps/WLS1221ResponseFile.rsp -logLevel severe -debug
 

o/p 


Weblogic 12c installation script

Weblogic 12c installation script

This script we can use to Install WLS Infra for 12c FMW versions.

 silent_install_WLS.rsp

[ENGINE]

#DO NOT CHANGE THIS.
Response File Version=1.0.0.0.0

[GENERIC]

#The oracle home location. This can be an existing Oracle Home or a new Oracle Home
ORACLE_HOME=/home/soa/srinfo01/Oracle/Middleware/Oracle_Home


#Set this variable value to the Installation Type selected. e.g. WebLogic Server, Coherence, Complete with Examples.
INSTALL_TYPE=WebLogic Server

#Provide the My Oracle Support Username. If you wish to ignore Oracle Configuration Manager configuration provide empty string for user name.
MYORACLESUPPORT_USERNAME=

#Provide the My Oracle Support Password
MYORACLESUPPORT_PASSWORD=

#Set this to true if you wish to decline the security updates. Setting this to true and providing empty string for My Oracle Support username will ignore the Oracle Configuration Manager configuration
DECLINE_SECURITY_UPDATES=true

#Set this to true if My Oracle Support Password is specified
SECURITY_UPDATES_VIA_MYORACLESUPPORT=false

#Provide the Proxy Host
PROXY_HOST=

#Provide the Proxy Port
PROXY_PORT=

#Provide the Proxy Username
PROXY_USER=

#Provide the Proxy Password
PROXY_PWD=

#Type String (URL format) Indicates the OCM Repeater URL which should be of the format [scheme[Http/Https]]://[repeater host]:[repeater port]

COLLECTOR_SUPPORTHUB_URL=

oraInst.loc

inventory_loc=/home/soa/srinfo01/app/oraInventory

inst_group=soa

installWLS.sh

#!/bin/sh


# Install WLS Infra

export JAVA_HOME=/home/soa/srinfo01/Oracle/Java/jdk1.8.0_71
export FMWJAR_HOME=/home/soa/srinfo01/app/softwares/FMW
export RESPONSEFILE_HOME=/home/soa/srinfo01/app/ResponseFiles
export INVENTORY_HOME=/home/soa/srinfo01/app/oraInventory


$JAVA_HOME/bin/java -jar $FMWJAR_HOME/fmw_12.2.1.1.0_wls.jar  -silent -responseFile $RESPONSEFILE_HOME/silent_install_WLS.rsp -invPtrLoc $INVENTORY_HOME/oraInst.loc

Domain creation in weblogic 12c


Weblogic domain is an administrative unit on Weblogic Platform.Each domain must have one Administration Server.Administration server will administrate the domain, all the field configurations and deployments will store under Administration server.
Other than administration server all other servers we called as Managed Servers.


Here is the script to create Weblogic Domain


#=======================================================================================
# Usage: 
#      java weblogic.WLST  
#
# Where: 
#       specifies the full path to the WLST script.
#=======================================================================================

#=======================================================================================
# Open a domain template.
#=======================================================================================

readTemplate("/u02/jenkins/oracle12c_r2/mw_home/oracle_home/wlserver/common/templates/wls/wls.jar")

#=======================================================================================
# Configure the Administration Server and SSL port.
#
# To enable access by both local and remote processes, you should not set the 
# listen address for the server instance (that is, it should be left blank or not set). 
# In this case, the server instance will determine the address of the machine and 
# listen on it. 
#=======================================================================================

cd('Servers/AdminServer')
set('ListenAddress','aussoaditapp16.us.dell.com')
set('ListenPort', 25019)

create('AdminServer','SSL')
cd('SSL/AdminServer')
set('Enabled', 'True')
set('ListenPort', 25020)

#=======================================================================================
# Define the user password for weblogic.
#=======================================================================================

cd('/')
cd('Security/base_domain/User/weblogic')
cmo.setPassword('jenkins@domain1')
# Please set password here before using this script, e.g. cmo.setPassword('value')

#=======================================================================================
# Create and configure a JDBC Data Source, and sets the JDBC user.
#=======================================================================================
#set('URL','jdbc:derby://localhost:1527/db;create=true')
#set('PasswordEncrypted', 'PBPUBLIC')
#set('UseXADataSourceInterface', 'false')
#create('myProps','Properties')
#cd('Properties/NO_NAME_0')
#create('user', 'Property')
#cd('Property/user')
#cmo.setValue('PBPUBLIC')

#cd('/JDBCSystemResource/myDataSource/JdbcResource/myDataSource')
#create('myJdbcDataSourceParams','JDBCDataSourceParams')
#cd('JDBCDataSourceParams/NO_NAME_0')
#set('JNDIName', java.lang.String("myDataSource_jndi"))

#cd('/JDBCSystemResource/myDataSource/JdbcResource/myDataSource')
#create('myJdbcConnectionPoolParams','JDBCConnectionPoolParams')
#cd('JDBCConnectionPoolParams/NO_NAME_0')
#set('TestTableName','SYSTABLES')

#=======================================================================================
# Target resources to the servers. 
#=======================================================================================

#cd('/')
#assign('JMSServer', 'myJMSServer', 'Target', 'AdminServer')
#assign('JMSSystemResource.SubDeployment', 'myJmsSystemResource.myQueueSubDeployment', 'Target', 'myJMSServer')
#assign('JDBCSystemResource', 'myDataSource', 'Target', 'AdminServer')

#=======================================================================================
# Write the domain and close the domain template.
#=======================================================================================

setOption('OverwriteDomain', 'true')
writeDomain('/u02/jenkins/domains/jenkins_domain')
closeTemplate()

#=======================================================================================
# Exit WLST.
#=======================================================================================

exit()

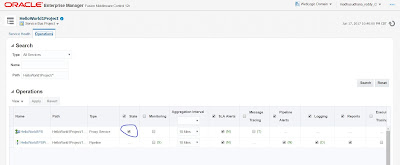
How to Disable/Enable ProxyService in OSB 12c

How to Disable/Enable ProxyService in OSB 12c

Before 12c in older versions if we want to enable/disable ProxyService we need to login sbconsole.

But in 12c that option moved to EM console.

Here are the steps to enable/disable ProxyService.

1) Login to EM console 

2) Navigate to OSB Project--> Operations tab

3) Select the ProxyService and enable or disable checkbox for state option.


Sunday 15 October 2017

Oracle Managed File Transfer (MFT) Step By Step Installation Guide

Oracle has introduced MFT (Managed File Transfer) tool in Oracle SOA 12c. MFT enables secure file exchange between two points; these two points can be internal or external.

This post is step by step installation guide of Managed File Transfer (MFT).

In this release of Oracle SOA 12c, we can't use Java DB for MFT. We have to use Oracle database.

There are some Prerequisites for MFT Installation which are mentioned below.

·

Follow Below chapters to install MFT.


SOA 12c- Oracle Managed File Transfer (MFT) Installation

This is Chapter-1 of MFT installation guide. You need to fulfill all the prerequisites which are mentioned in Installation guide before you start with this post.

In this post, we see how to install the Managed File Transfer.

First of all, download the MFT installer from Oracle. Once you download it run the installer.

Note that it is executable jar so to run the installer we need to go to java bin folder and run this executable jar file from there using below command.

Java –jar executable_jar_file_location

Oracle MFT Installation

This will launch the installer wizard.

Oracle MFT Installation


Click on next.

Oracle MFT Installation


Choose already existing Oracle home path as we install MFT to already existing oracle folder.

Oracle MFT Installation


Wizard will perform prerequisites checks.

Oracle MFT Installation


Click on Install to install the MFT.

Oracle MFT Installation


Below screen shows the installation progress.

Oracle MFT Installation


Click on finish once installation is complete.

Oracle MFT Installation


Now go to next Chapter which is Chapter-2 of MFT Installation guide.

SOA12c - RCU Step by Step Installation


RCU comes with Oracle SOA 12c installer, so you need not to download it separately.  You can find rcu file at below location.

ORACLE_HOME\oracle_commom\bin\rcu.bat

To run the rcu go to oracle_common bin folder.

RCU 12c Installation


This will launch the RCU wizard. Choose "System Load and Product Load" if you DB privilages.


RCU 12c Installation


Provide oracle database details and click on next.


RCU 12c Installation


It check prerequisites.


RCU 12c Installation


Specify schema prefix and choose the components which you need.


RCU 12c Installation


it will check prerequisites.


choose same password for all the schemas.


RCU 12c Installation


Click on next.
RCU 12c Installation


RCU 12c Installation


RCU setup will create required tablespace.


RCU 12c Installation

click on create to create required schemas.


RCU 12c Installation

RCU 12c Installation